
In this article, I’m going to serve you in a different educational way to work with each other on how to install and launch WordPress on the local environment using the XAMPP program. The XAMPP program allows you to install in your personal computer, offline and without the need for a domain and hosting, any script, including WordPress, and work on it as if it was online lets now start with learning how to install WordPress on XAMPP.
What is Local Area Hosting? And why should we use it?
Localhost is a comprehensive definition of the possibility of installing and launching a website in your computer environment, by which you are able to create exactly the same type of online website on your computer, and within it, designing or even training in the field. Design your website so that you do not need to buy domains and hosts, and improve your skills in designing a website. So the purpose of the localities is to provide a real platform for a website on our computers and similar to an online website to operate and build various sections of a website. If we want to compare the localities with an online website, I can say that you do not need to buy domains and hosts on the localities and by going to http://localhost/SITE_NAME you will be able to see exactly the same thing as a real website. Simply, instead of SITE_NAME, just enter your domain name without extensions, which we will discuss in more detail.
What does WordPress needs?
WordPress requires a series of interpreters to install, and run, in other words, to run a PHP file and the commands we put into the output, we need to have an interpreter here. We mean something like Mysql database that is installed with our web server, such as Apache, IIS, and so on, so that it can be able to receive, process and print the output of the command to display. Well, these are provided to us at one website, and it’s enough to access these sites in the hosts and domain that we purchased. But when we try to install and use WordPress on our personal computers, this is not possible in normal mode, and it is necessary to have some required items, which are both Apache interpreters and web server based. Install and launch an environment that is exactly the same as having an online website. This is where the locals come to our aid. Installing PHP and MySQL, each of which is very difficult for beginners, it is here that using the XAMPP program, we can launch WordPress, Joomla, and any kind of scripts that we are looking at locally on our computer.
Thanks to the locals, today all website designers have to design and implement a custom project to receive a project, and after the finalization of the project, they will be backed up and downloaded from the website and transferred to the online environment. Without any defect in the domain connected to the host to which the design has access.
XAMPP installation tutorial
To create localhost In this tutorial, we plan to use the XAMPP server program:
- The latest version of Xampp based on a computer operating system
- Installing and launching the application
- Download the latest version of WordPress
- Create a WordPress database and install it
XAMPP installation tutorial with photos
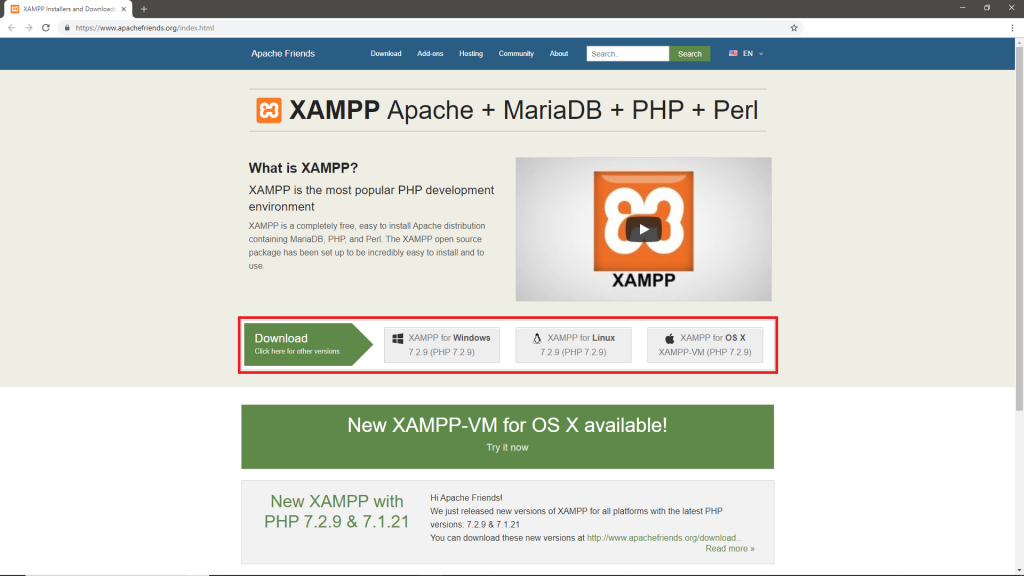
To get started, first download the latest version of the XAMPP software for your operating system that you are currently using, similar to the image below go to https://www.apachefriends.org/index.html. In this tutorial, we are going to show you how to install the XAMPP version 7.1.7 in the Windows environment, which includes the php version of the program on its newest version, php 7.1.7.
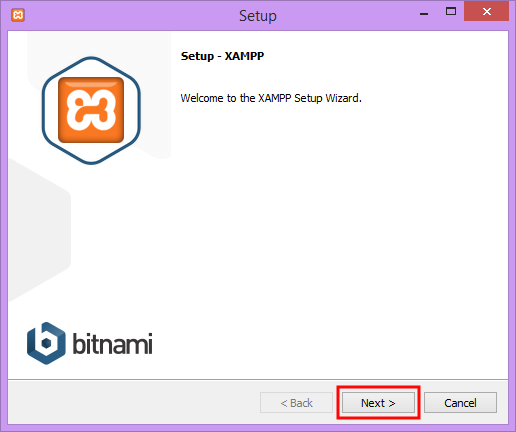
After downloading the required file for your device, double-click on the downloaded file to run the installation. After clicking on the install file, the same window as below will appear, just click the Next button to navigate to the next step.
After clicking the install button, the following image can be used to install Xampp components. As you know, WordPress uses the Mysql database, PHP scripting language, and Linux web servers to install and run, so at this point you are able to select them and in addition to the other features that this application provides you with. I suggest that you leave other options other than Filezilla intact, as you might want to use them in the future.

After passing this step, you must select the drive you want to install the XAMPP program on your personal computer, in the normal way, which is the default on Windows, the XAMPP directory that is located in the directory and path C: \ XAMPP. You can choose from any root drive from your Windows partition to install the XAMPP program so that if you jump to Windows or for any reason you have to reinstall Windows, you will not have to start from step 1.

In the next step, another window opens to you as shown below. By visiting the site, you can get more familiar with the popularity of this program, as well as get support from other forums. If checked, the option will open the website in the browser.
Finally, by clicking on the Next option in this step, the Startup installation starts in Windows, wait for the installation to continue until the end.

When installing, you may see the same image below, which is asking you to allow access to the firewall, if you encountered this message Just click on the Allow Access button and export permission.

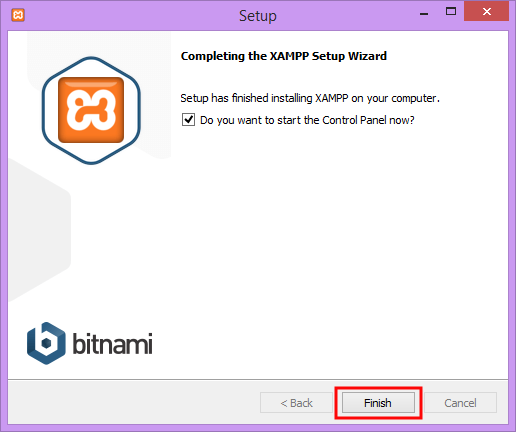
Finally, after completing the installation process, if all the steps are completed correctly, as shown below, the successful installation message is displayed to you and just click on the Finish button and wait a bit until the XAMPP program runs on your computer.
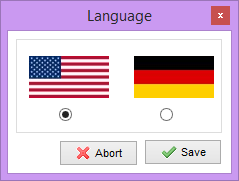
After the first run, the program opens a window for you and asks you to select the language you want to work with the XAMPP program, just select the language that you are more comfortable with and finally click the Save button.
Note: remember that each time your computer is restarted or simply shut down, you need to click on the Start buttons located in front of Apache and Mysql, just like a real server, turning them on so that the website you are running and accessing in the local environment can work.
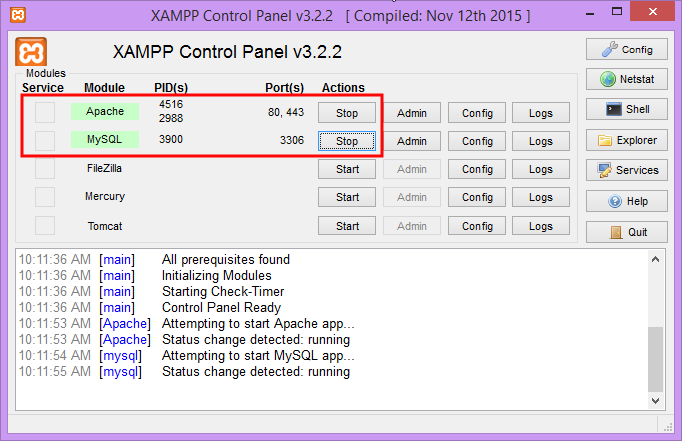
By clicking on the buttons, they are yellow in the first place, and if they are installed correctly and there is no problem, similar to the image, they will change the color, which indicates their brightness, but if you are in complete redundancy, there is a problem with their implementation. So keep cool and keep reading the end of this article to study ways to fix the XAMPP program error for a variety of situations that are common among users and to fix your problem, to ensure that all the issues related to the installation of the localities are The correct run just open your browser and go to http://localhost. If you do not encounter an error, then the XAMPP homepage is displayed for you, indicating that the installation process is successful.

Installation process of WordPress on XAMPP
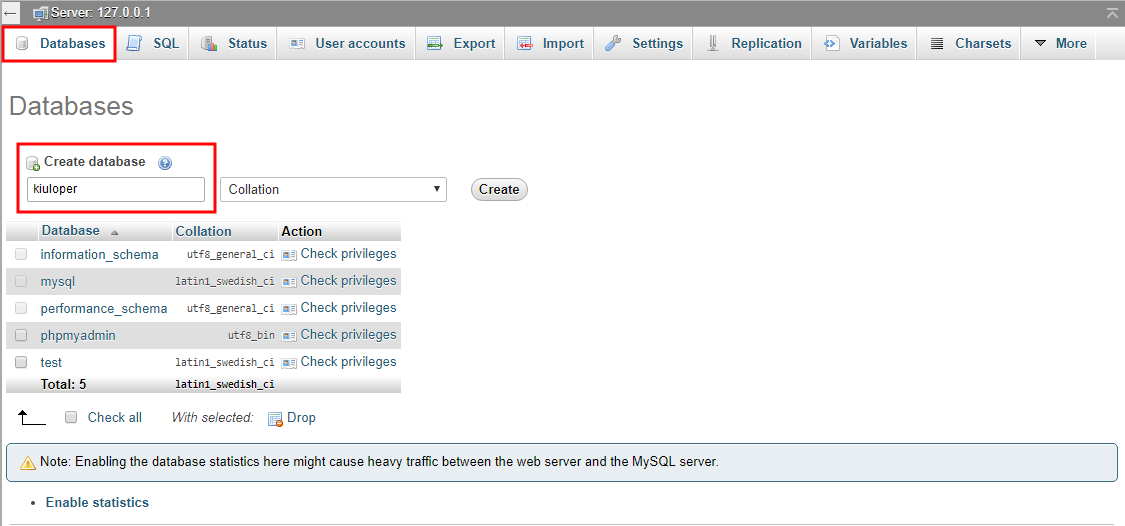
After the success of the installation of XAMPP, it’s time to install WordPress on local hosts using the XAMPP program. You need to create a database first, so go to the http://localhost/phpmyadmin to build the database, just like the following screenshot. Create a database.
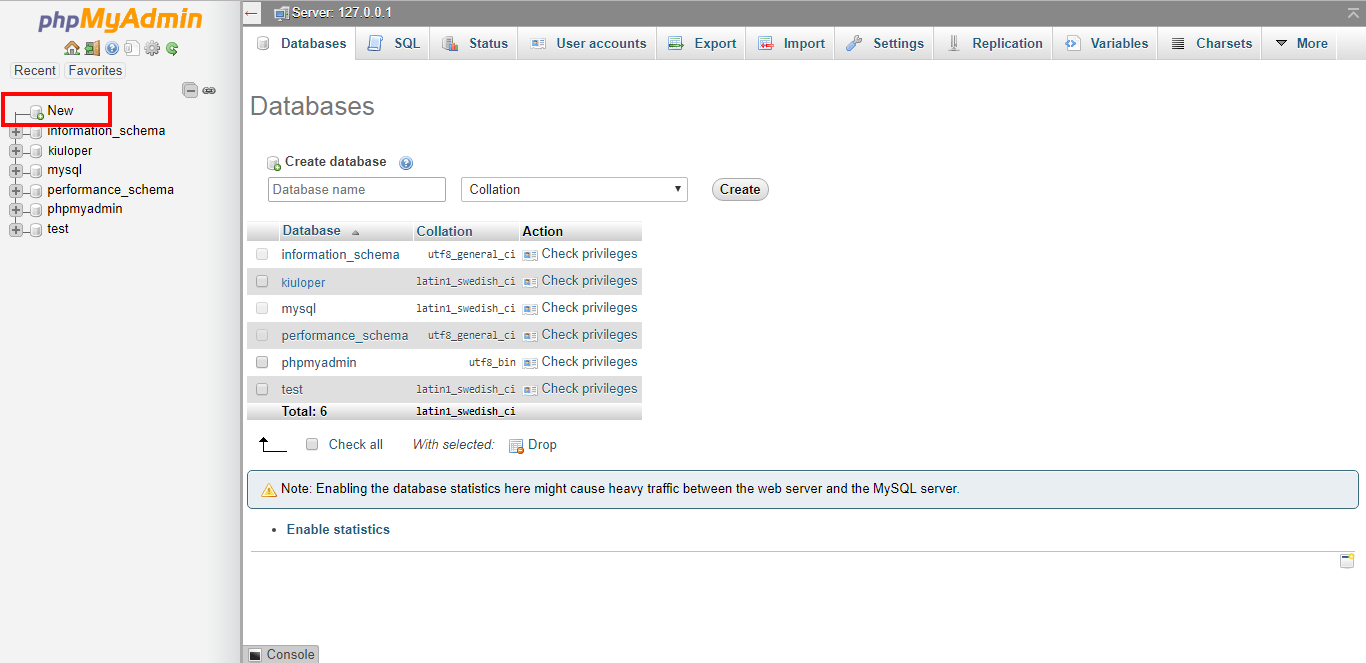
Now you can click on the New option in the left menu and then in the Create database field enter the name of your database in English, like the screenshot below, click on Database first and create the database from there, Finally just click the Create button, and we are done.
Lets start installing WordPress now!
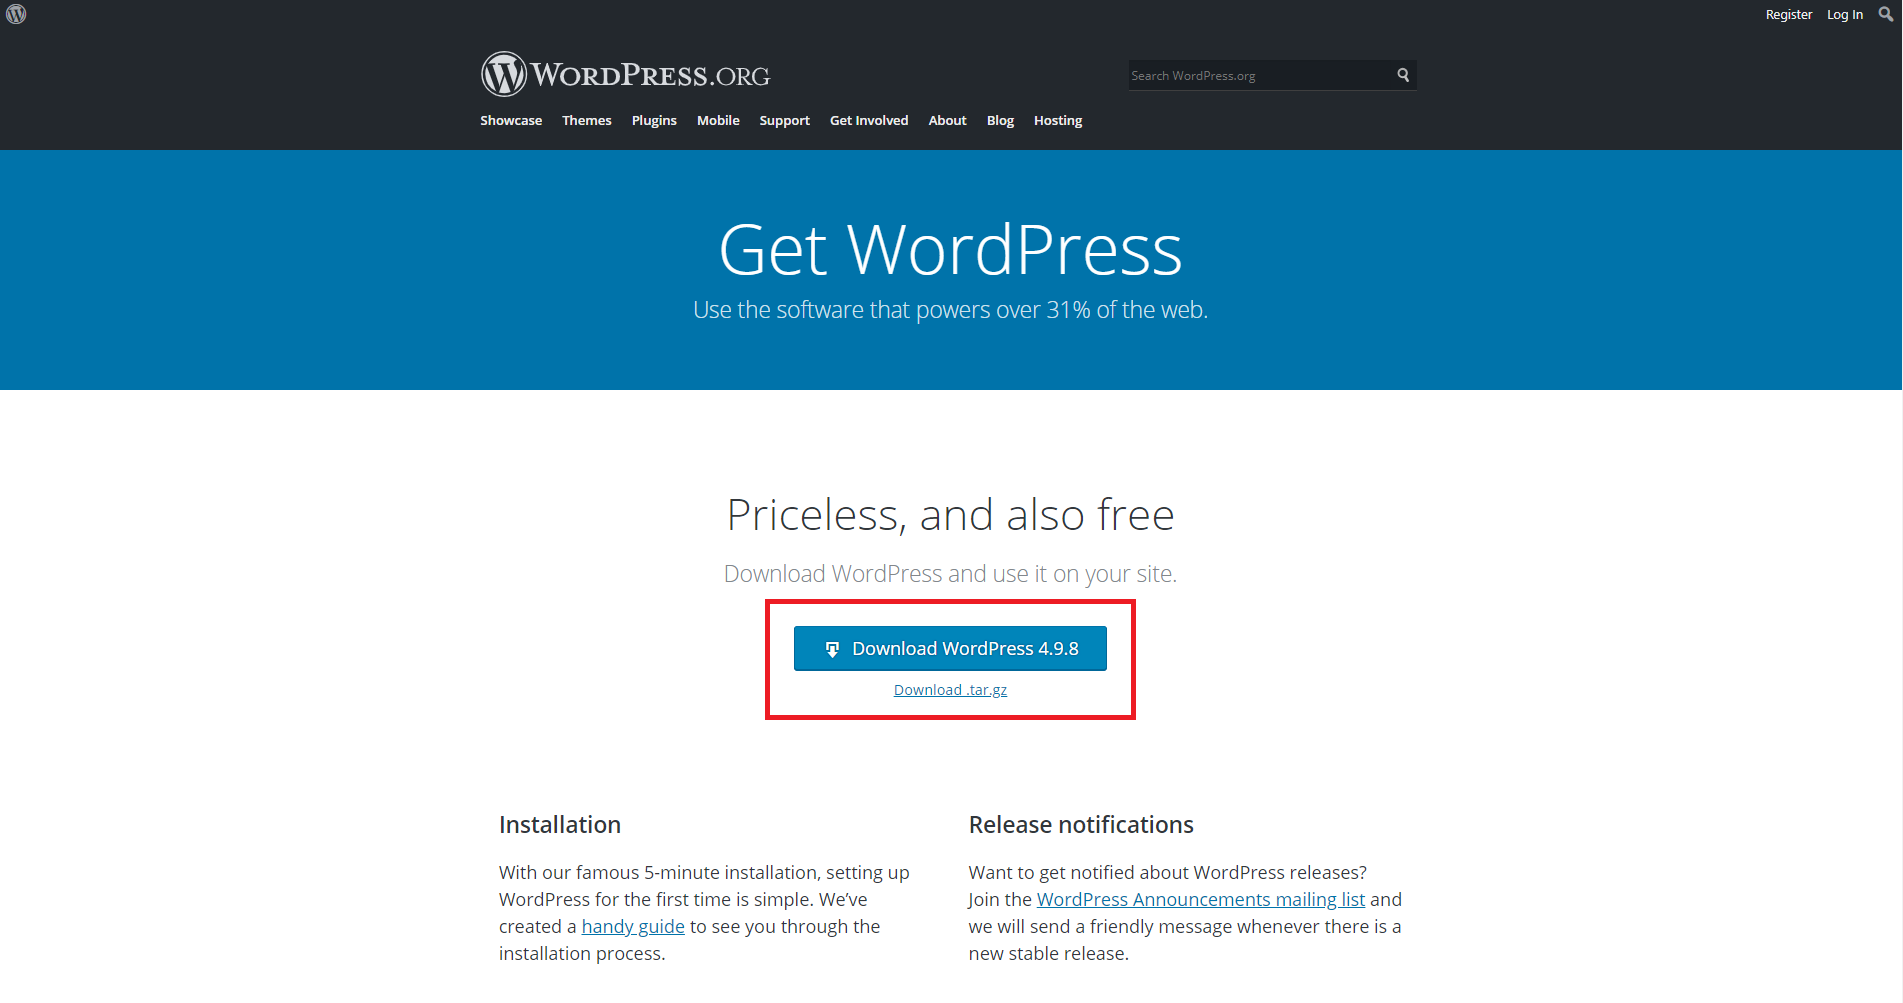
Now we need to install WordPress, first by downloading the latest version of this popular content management system by visiting the official WordPress website, I suggest you to visit https://wordpress.org to get the latest version.
After downloading the WordPress version, go to the c:\xampp\htdocs folder in drive C and create a new folder with the address that you intend to run in the browser after visiting that site. Here, I chose kiuloper as the name, so I need to go to localhost/kiuloper to access WordPress and view the website in the localhost, and I can fully manage the website that I am creating locally.

Once you’ve created the folder, copy the downloaded WordPress file from zip mode. Then transfer the files in the WordPress folder using the cut function to c:\xampp\htdocs\kiuloper directory. Next, similar to the image below, rename the file wp-config-sample.php in the WordPress script to wp-config.php and proceed to enter the database information in the order we will continue to handle it.
DB_NAME: This section contains the name of your WordPress database, which we created on the phpmyadmin page, a database called kiuloper, so just like the above example, enter your database name, which is the name of our database here is kiuloper.
DB_USER: This section also includes the username of the WordPress database, in the default state, the username of the database is root, so, as an example, enter root instead of the database user.
DB_PASSWORD: Since it does not select this option in the build of the database using the zip password program, leave it out of the password_here and leave it blank.
After properly entering the desired items, save the file using the combination keys Ctrl + S to store information about the WordPress database that contains the database name, database username, and database password, then open your browser and then go to http://localhost/the-name-of-the-folder-where-WordPress-is-located. Here, our folder is stored as kiuloper, so to access WordPress and continue installing the WordPress steps, we go to http://localhost/kiuloper address.
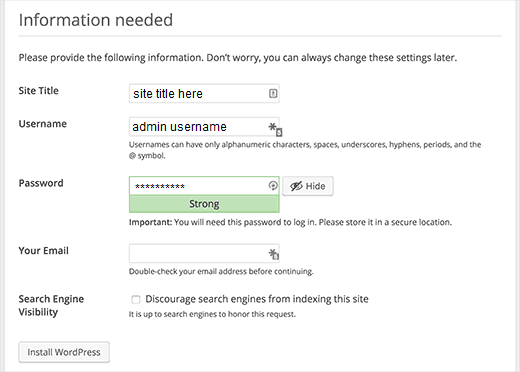
After opening this web page, you will see that you can enter information about the website including the following:
Site Title: Enter the heading for the website in this field. This is going to be the title of your website, which is displayed on the browser page title by visiting the website’s homepage.
Username: Enter the username of the admin in this field. Be careful about maintaining this username, because we need this username to enter the WordPress counter and manage the website.
Password: Enter the password you want to enter into the WordPress counter. Try to use a strong password that contains numbers, symbols, and upper and lowercase letters to get high security.
Email: In this field, enter your email. This email is for WordPress and other things like WordPress Password Recovery, which we will discuss in detail later in this article.
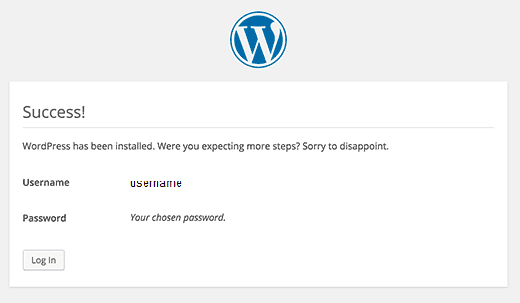
We finally finished the WordPress installation, a message similar to the one shown above will be displayed and you will be able to click on the login button to get redirected to the login page of WordPress. Check out and manage your WordPress counter.
Troubleshoot errors when installing XAMPP
So let’s look at the problems that are commonly encountered between users when trying to run or install XAMPP.
Fix the error of not running the Apache web server
One of the most common mistakes made in the WordPress localhost environment created with XAMPP is that the Apache web server that encounters an error while running the software and clicking the Start button to execute it. As the Apache server, as well as the mysql server, is active when working with XAMPP, it encounters an error and virtually our site does not run in the local environment. This problem occurs because the Apache web server uses port 80 to run, it may be installed by the root program installed on your computer, which is why the Apache web server does not run on this port because of the Encountering an error.
To fix this problem, refer to the path that the XAMPP program installed and then in the XAMPP folder, as shown in the screenshot below, open the apache directory and then by looking in the conf folder of the file named httpd.conf in it. Use a text editor program such as notepad. Now try to use the search function with the Ctrl + F combination keys to search for the phrase Listen to find the following line.
Listen 0.0.00:80 #
Listen [::]: 80
Listen 80
It’s enough to just change 80 of all other lines above to 81, and then Apache runs on Port 81 and you can use it. Finally, save the file and then click on the Quit button to exit the program, and then run the program again and click on the start button in front of Apache, you will see that the problem is resolved and it turns green, Click the Start button next to Mysql to make the php database clear and then simply access your website.
Fix “api-ms-win-crt-runtime-l1-1-0.dll” error
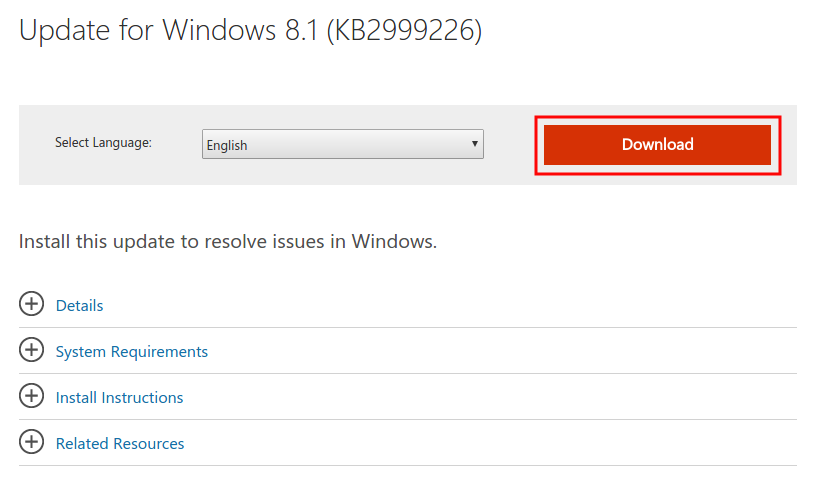
To fix this error, first, update Windows itself to the latest available version, and then once you reboot Windows and run it again, if it still was a problem again, check back again by visiting the Windows Update Center. If there is a new update, update it and run the reboot after installation. If you still have the same problem go to the Update for Universal C Runtime in Windows page Download Windows Installer file and install and then reinstall Windows XAMPP again to fix your problem.

After selecting the desired version of Windows, you will be redirected to the boot page by clicking the Download button in the msu format. With a very small volume, after downloading, double-click on the downloaded file, and after a simple installation, reboot your system and run the Xampp program to fix the problem.
Fix “object not found” error in local host
This error occurs when the directory of the WordPress installation is incorrect. This usually occurs if you change the folder where WordPress is installed, and to fix this, we need to change the folder name to the same name as before.
Fix the error “You do not have permission to access”
This error is due to the impossibility of allowing access to the IP address in phpmyadmin, and to address it, first, go to path c: \ wamp \ alias \ phpmyadmin.conf and then use the file named phpmyadmin.conf using a text editor software. Like the Notepad, you will see that the following code is in it.
Alias /phpmyadmin "c:/wamp/apps/phpmyadmin3.1.3.1/" #
to give access to phpmyadmin from outside #
replace the lines # #
 Order Deny,Allow #
Deny from all #
Allow from 127.0.0.1 # # by # #
Order Allow,Deny #   Allow from all #
Options Indexes FollowSymLinks MultiViews
AllowOverride all
Order Deny,Allow
Deny from all
Allow from 127.0.0.1
As you can see, at the last couple of lines, Deny from all, all you have to do is to change it to Allow from all, now click on the Quit button and re-run it by clicking the start buttons that are located in front of Apache and Mysql and go to your website. If you still encounter such an error, this time, delete the last line that includes Allow from 127.0.0.1 and then re-test. If the problem persists again, this time, open the file phpmyadmin.conf and change the Allow from all to Allow from 127.0.0.1 ::1 and save the file.
Alias /phpmyadmin "c:/wamp/apps/phpmyadmin3.1.3.1/" #
to give access to phpmyadmin from outside #
replace the lines # #
 Order Deny,Allow #
Deny from all #
Allow from 127.0.0.1 # # by # #
Order Allow,Deny #   Allow from all #
Options Indexes FollowSymLinks MultiViews
AllowOverride all
Order Deny,Allow
Allow from 127.0.0.1 ::1
After saving the file, disable it again and run it to fix the problem this time, and if there was a problem, contact us, and wait a bit for us to provide some ways to fix this problem.
“Maximum execution time of 30 seconds exceeded” error
This error occurs because of the time limit of php implementation. By default, due to increased security in php, the duration of a run is limited to 30 seconds, which means that if during this time your server can not process the information It does not show you the output. This error is displayed on the websites that you encountered with Timeout Error. This problem generally occurs at the time of the start of the run. To solve this problem, it’s just a matter of time to take some cool beverage, and then once again you want to re-launch the look and check the local area. I’m sure the problem Fixed and you can access your website locally.
Error Establishing a Database Connection in WordPress
One of the mistakes that may be encountered when using the XAMPP program to use WordPress is the error in communicating with the WordPress database or Error Establishing a Database Connection, which means that your site is not able to access the database for any reason. WordPress, which has the same name as Mysql, can be linked to by linking information to the site. So the problem may be due to incorrect database information, database problems, site error, and something like that.
First go to the files in the path where WordPress is installed and open the wp-config.php file using a text editor program and verify that the database information that contains the name, username, and password of the database.
define('DB_NAME', 'database-name');
define('DB_USER', 'database-username');
define('DB_PASSWORD', 'database-password');
define('DB_HOST', 'localhost');
If the information was correct, and the problem is still there, by visiting /wp-admin / again, open the file wp-config.php and write the following code in it.
define('WP_ALLOW_REPAIR', true);Now go to localhost / SITE_NAME / wp-admin / maint / repair.php, note that instead of SITE_NAME, you must enter the name of the folder where WordPress is installed. By visiting this page, the following page will be opened for you by clicking on the Repair Database button to repair your WordPress site database. By selecting the Repair and optimize database button, you can also optimize the WordPress database in addition to database repair.

Once you’ve done this, open the site to see if the problem is resolved or not, make sure to clear the code snippet after doing this from the wp-config file.
Another way to access the site is to access it through the IP address, so open the wp-config.php file and put the code below in the right place and save it.
define('DB_HOST', '127.0.0.1:8889');Now enter the IP address 127.0.0.1.18889 in the browser and go to see the site.
And finally, to make sure that Mysql is properly installed on your system, create a file named testconnection.php in the folder where WordPress is installed and place the following code in it. Be sure to change the username, user, and password in this code snippet.
<?php
$link = mysql_connect('localhost', 'root', 'password');
if (!$link) {
die('Could not connect: ' . mysql_error());
}
echo 'Connected successfully';
mysql_close($link);
?>
Now call the file by visiting its address. If there is no problem in your database, the Connected successfully message will be displayed to you.
Finally…
I hope you can install WordPress with this tutorial completely on XAMPP. If you have a question or problem about installing WordPress, please send your question through the comment form at the bottom of this article.
2 Responses
This article of yours is really very informative. Even someone with just a little to basic programming knowledge can understand and follow it. Thanks for sharing useful information!! I am really impressed to see that you have provided such an interesting information about WordPress.
I was struggling to find such article. Anyways can you suggest me some better option to get Cheap Linux hosting other than redserverhost.com?
Thank you once again!!
Hope this article helped! as for your question, yes, kiuloper.com offers the fastest and cheapest Linux hosting in the world.